

How To Properly Install Window Tint
Every editorial product is independently selected, though nosotros may be compensated or receive an chapter commission if yous buy something through our links. Ratings and prices are authentic and items are in stock as of time of publication.
Window tinting keeps your car libation, protects interior surfaces and offers privacy. Save coin by learning how to tint car windows yourself.
Tinting your vehicle's windows adds style, reduces sun glare and keeps interiors cooler. It blocks upwards to 99 percent of ultraviolet radiations (UV) rays and filters 90 percent of the sun'southward infrared radiations (IR). This helps protect interior surfaces from damaging sunlight and allows your air conditioner to operate more than efficiently.
The Skin Cancer Foundation recommends reducing exposure to UV rays as an effective defense against UV radiation, a leading cause of pare cancer. Read on to acquire how to install window tint picture yourself, saving you lot hundreds of dollars.
What Is Car Window Tinting?
Window tinting is a plastic moving picture applied to your vehicle's windows that darken the glass. This helps reduce Visible Light Transference (VLT), the amount of visible light (VL) passing through drinking glass. Tints are rated past their VLT. The higher the VLT percentage/number, the more VL information technology lets in.
Virtually every vehicle sold in the United states of america comes standard with tinted glass. To stay inside your state'southward legal limits, it's important yous compensate for manufacturing plant VLT before adding aftermarket window tint. Know your state'due south laws before choosing the VLT per centum.
What Are the Dissimilar Types of Window Tints?
There are several types, each with specific features, characteristics and properties.
- Dyed: By and large used for appearance and privacy.
- Metalized: Embedded with metallic particles that reflect heat and UV radiations.
- Hybrid: Combines the all-time characteristics of dyed and metalized tints.
- Carbon: Micro layers of polymer and carbon reduce UV and IR.
- Ceramic: Highest quality and nigh technologically avant-garde tint available.
Y'all tin buy window tint pre-cut for your vehicle, or on a whorl that yous cut to fit.
Things To Consider When Choosing Window Tint
Call back about your motivation, rubber and above all your state'south tint laws earlier choosing the type and VLT pct.
- Windows that are too dark can impact your visibility while driving, especially at night.
- Blocking UV rays and IR light extends the life of seats, carpets, dash pad and trim.
- Cooler interiors reduce ac usage, increasing fuel economy.
- Tinted windows tin add together appeal and heighten the advent to your ride.
- Tinted windows add privacy.
How To Tint Auto Windows
Install window tint in a clean, dry, shaded, dust-complimentary area — working in a garage is all-time. Exist patient and don't rush. Carefully follow all steps to do the job properly. It may take 30 minutes or longer to correctly install window pic on each side window.
Use soapy water to continue your fingers wet. Don't crease the moving-picture show while installing. An extra set of easily is helpful.
Tools/Materials
Make sure y'all have everything you need before showtime the installation. Consider purchasing an inexpensive installation kit that includes several of the items listed below:
- Window film;
- Large spray bottle full of soapy water — you'll need at least a gallon, so premix two tablespoons of dish detergent with a gallon of warm water;
- Razor blade scraper and blades;
- Microfiber towels;
- Tint squeegee or applicator;
- Silicone duster;
- Precision knife with replacement blades;
- Vacuum cleaner;
- Rut gun.
Ready the Windows
NEVER use a commercial glass cleaner, or one with ammonia. They can modify the color of the tint.
Vacuum the interior to remove dust and clay. Thoroughly wash the inside and exterior of the windows with the soapy water. Lower the window to clean the acme of the glass, then heighten the window to the closed position. Wet the window once more. Apply the razor scraper to remove any remaining dirt, grime or sticker residue.
Thoroughly clean around the window trim, seals, gaskets and whatever nooks and crannies that could be hiding dirt or grime. Completely dry the drinking glass with the duster and dry microfiber cloths. Wrap a cloth around your squeegee to dry under the window trim and seals.
Size the Tint Film
Information technology's important to determine which side of the film has the adhesive. Exercise not remove the adhesive liner. In this step you lot're not installing the tint, you're using the outside of the glass every bit a template. Starting at the passenger forepart-side window:
- Saturate the outside glass with soapy h2o.
- Unroll the tint.
- With the adhesive side facing you, leaving plenty of overhang, completely comprehend the entire outside of the window.
- Cut this piece from the roll.
- Gently press the tint onto the glass to temporarily go along it in identify.
- Trim the film into a manageable size, almost a square, leaving two to three inches overlapping the glass.
- Wet the film and shine it with the tint duster.
- Concord the movie in identify with the duster or your mitt.
- Using the window seals equally your guide, cut forth the lesser (front to back), so forth the back of the glass with the precision knife.
- Pro tip: Cutting at a depression angle using just plenty pressure level on the bract to cut the film.
- Pull the film direct back until information technology's overlapping the back of the window (the border you just trimmed) by 1/two-inch.
- Trim the front direct side of the film (the section by the sideview mirror).
- Eye the film, there should exist 1/four-in. of actress moving-picture show at the front and back of the glass.
- Pull down on the film until it'southward 1 inch lower than the bottom of the glass.
- Moisture the bottom of the moving-picture show and gently lift the film away from the lesser of the glass/body.
- Lower the window ane inch.
- Wet the glass and smooth out the film with the tint squeegee.
- Cut the top edge of the moving picture using the glass as your guide.
- Leaving the one inch overhang at the lesser of the glass, carefully cut away whatever actress film at the forepart or rear of the glass.
- Smooth out the corners or any wrinkles.
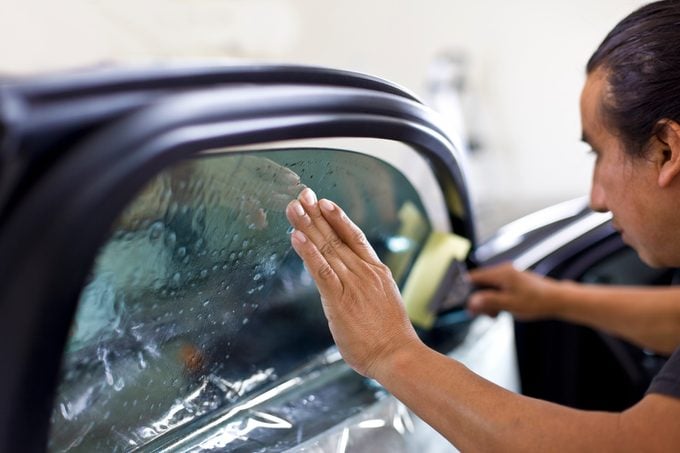
Employ the Tint Film
- Thoroughly wash and completely dry the inside of the window and all window trim and seals over again. Dust or dirt left behind will cause the film to bubble.
- Spray the inside of the glass with plenty of soapy water.
- Remove the agglutinative backing before removing the movie from the outside window.
- Pro tip: Spraying the agglutinative with soapy water allows the film to slide into position more easily.
- With the window lowered i inch, carefully peel the flick from the outside glass.
- Use the moisture adhesive side against the inside glass.
- Pro tip: Earlier applying the film, coil up the bottom edge to keep the adhesive from picking upward any dirt.
- Spray the film and slide into position.
- Center the movie and leave it well-nigh i/16-in. of infinite beneath the top of the window.
- Working toward the sides and top, utilise the tint squeegee to push out h2o and air bubbles.
- Raise the window.
- Spray the bottom of the film and glass.
- Once more, utilize the tint squeegee to push out all the water and air bubbles from under the film.
- Using the squeegee or applicator, advisedly tuck exposed edges of the film nether the window seals.
- To foreclose trigger-happy, continue spraying the picture show as yous piece of work out air bubbles.
- Pro tip: A heat gun tin can help remove air bubbles, excess water and stretch the moving-picture show to properly fit curved windows. Don't get too close or keep the estrus gun on one section too long. Too much heat can damage the film.
- Once finished, dry out the picture show with a lint-complimentary microfiber cloth
Repeat these steps for each window. Once finished, don't lower the windows for at least 7 to 10 days to allow the adhesive to fully cure.
Source: https://www.familyhandyman.com/article/how-to-tint-car-windows/
Posted by: partridgevered1971.blogspot.com
0 Response to "How To Properly Install Window Tint"
Post a Comment